
1 Prerequisites
Before installing, make sure your Priority ERP system is ready. If unsure about any item, ask your Priority administrator — this takes them a few minutes.
- Priority OData REST API module is enabled on your Priority ERP system (on-premise or cloud).
- A Personal Access Token (PAT) — created in Priority under Personal Access Tokens. The App never stores your Priority password; only the PAT, encrypted.
- Forms are open for API use — every Priority form you want to sync must be listed in Priority's FORMLIMITED form (טופסי API) with the REST flag enabled for your API user. The App automatically shows only the forms your token can use.
- Network access — if your Priority server restricts inbound IPs, allow requests from monday code (see monday's networking docs (opens in a new window)).
2 Install the app
- Open the App's page on the monday.com marketplace and click Install (or use the install link from leonai.io).
- Choose the workspace and approve the requested permissions.
- That's it — the App's building blocks now appear in your Automation Center, and its views can be added to any board.
3 First-time setup — connect Priority
- Open any board → + Add view → Priority ERP Setup & Sync.
- Walk through the 4-step wizard: confirm prerequisites, enter your Priority API URL (e.g.
https://your-server/odata/Priority), company code, and PAT, then click Test connection and Save & continue. - Step 3 shows what the App read from your Priority: the schema (every form and field, including custom ones, with Hebrew descriptions) and your API permissions — only forms enabled for the API user in FORMLIMITED (with the REST flag) appear in dropdowns, together with all their subforms and sub-subforms. The App re-reads this from Priority once a day (never more often, to keep the load off your ERP); click Refresh forms & permissions to apply a change immediately.
- Step 4 (needed for trigger workflows using the real-time webhook method — the default; workflows using the automatic-check method need no setup): copy your personal webhook URL, register it in Priority under BPM Maintenance → Webhook Definitions, then add a business rule on the form you want to watch with Do the following → Webhook — include the form's key field (e.g.
CUSTNAME) in the message body. Requires Priority's Webhooks module. See "How the real-time trigger works" below — the URL is registered once and serves every workflow you'll ever build.
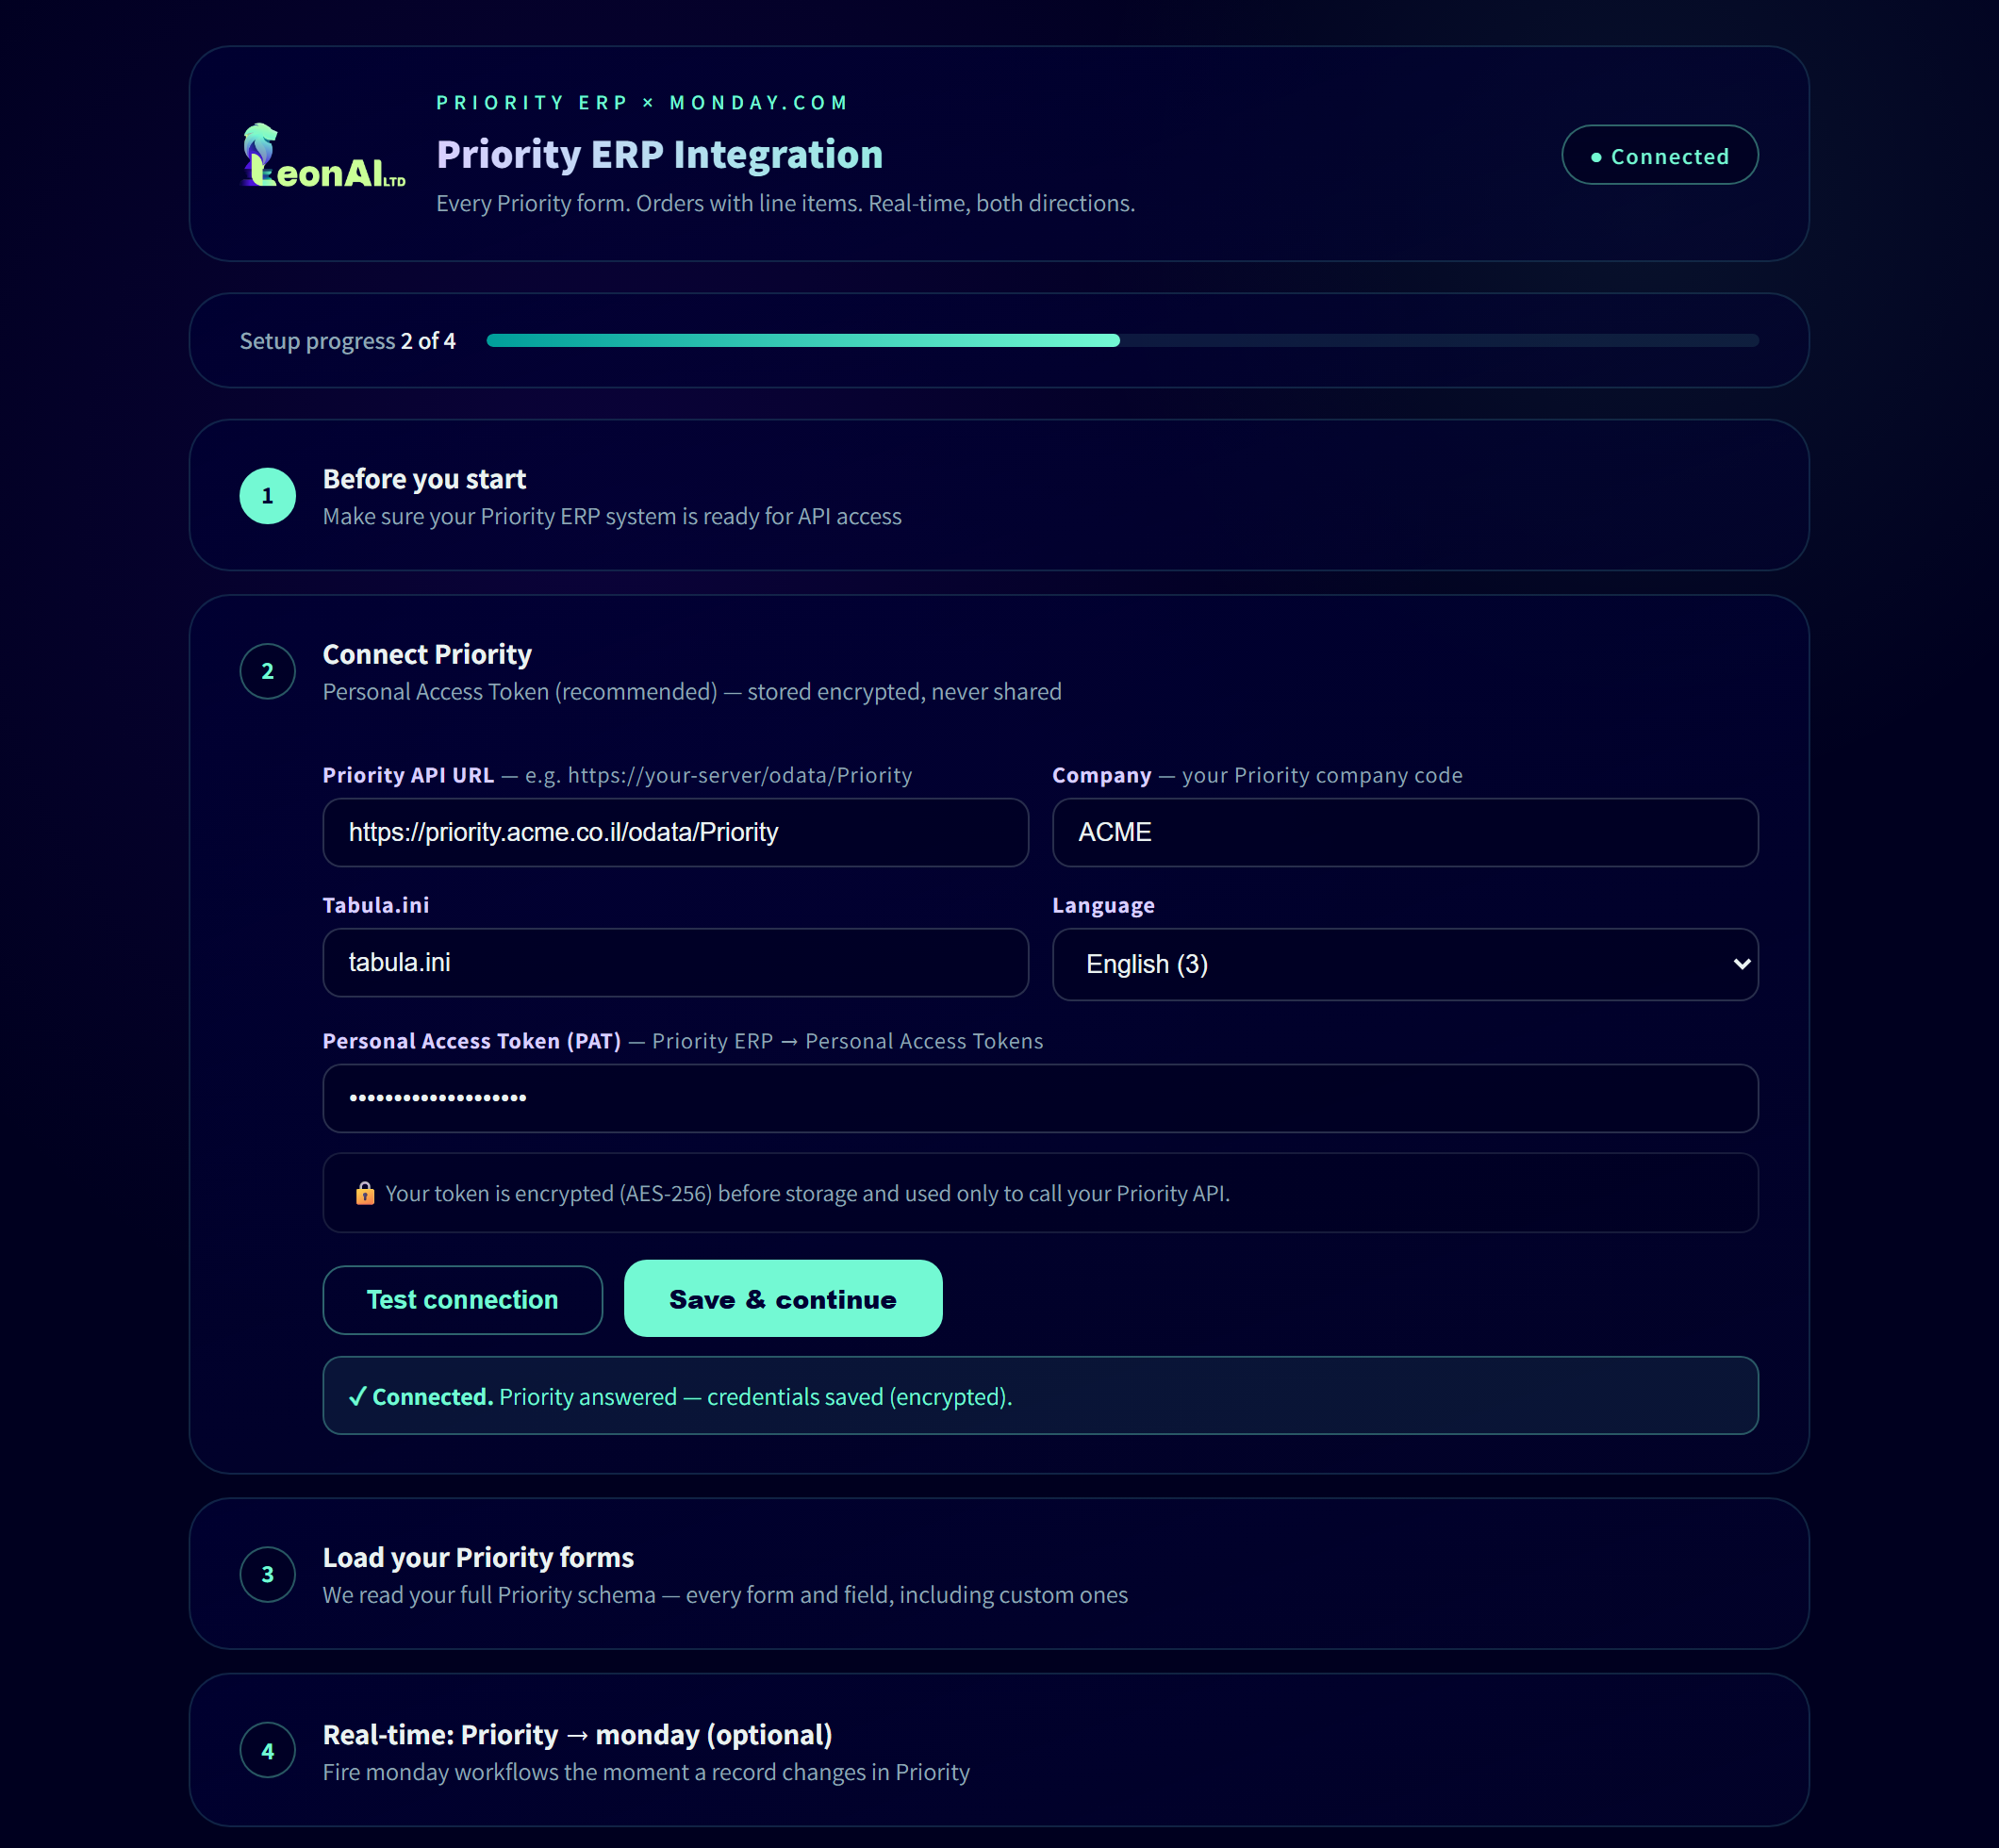
4 Build your first automation
- On any board, open Automate and search for "Priority".
- Pick a ready-made template (e.g. "When status changes, create a Priority record") or compose your own from the App's building blocks.
- In the block's settings, choose the Priority form — the dropdown lists your live schema, limited to the forms your API user may use (type to search, Hebrew or English) — then map fields with the Field/Value pairs (required fields are marked *), a mapping template, or advanced JSON.
How the trigger works ("When a Priority record changes")
You choose the delivery method — per workflow, right in the sentence:
- Real-time webhook (default, recommended) — instant, covers create / update / delete. Priority itself announces every change; needs the one-time URL registration described below.
- Automatic check — zero Priority-side setup: the App looks for new records about every 5 minutes with one light query per watched form (updates are detected only on forms with a modification timestamp; deletes are webhook-only). The builder offers this method only for combinations it can actually serve, so a workflow can never be configured to stay silent. Mixing methods on the same board is fine — nothing ever fires twice.
Setting up the real-time webhook:
- One URL, registered once — visible right in the builder. Your account has a personal shared webhook URL. Open the trigger's webhook dropdown in the sentence (or Setup & Sync → step 4) to see it, together with a live delivery status — when the last webhook arrived, from which form, and how many workflows it matched. Register the URL in Priority's Webhook Definitions one time — it serves all your workflows, current and future.
Prefer separate URLs? Your choice. Add named URLs in Setup & Sync → step 4 (one per department, per form — whatever fits your Priority setup), or pick "Dedicated URL for this workflow" in the webhook dropdown to give a single workflow its own address. The dedicated URL is created when you save the workflow — it is sent to you as a monday notification (bell + email) at that moment, and from then on it appears right in the workflow's webhook field with its own delivery status. Each workflow fires only from the URL it is bound to, and removing one URL never affects the others. - Priority decides when to send. A BPM business rule on each form you care about fires the webhook (per status change, creation, deletion — whatever the rule watches). One record change = one webhook.
- The App fans it out. Each incoming webhook is matched against every active workflow that uses the trigger: the workflow's Priority form and operation filters decide whether it fires. Three workflows watching CUSTOMERS updates → one webhook in, all three run; a workflow watching ORDERS stays silent. Each workflow receives the record ID, the operation (create / update / delete), and the full record JSON to use in its next blocks.
Several Priority companies or servers? Connect more accounts
Every action block has a Priority account picker. The first connection can come from the Setup & Sync wizard (the account default); to work with a second company or server, click Add new account in the picker — a connect form opens, tests the credentials against Priority, and saves them encrypted. Each connection keeps its own form list and permissions (FORMLIMITED), refreshed at most once a day, so an automation on company A and another on company B each see exactly their own forms and fields.
Record keys — typed, straight from your schema
Blocks that address an existing record (update / get / delete, read / write text, send / get files, child and grandchild records) show a Record keys editor — it reads the form's actual key fields from your Priority schema and renders one input per key field, with the field's name from your Priority and numbers typed as numbers. Paste a value or map a column / previous block output into each input. That's how you address a form with a composite key (an invoice: IVNUM + DEBIT + IVTYPE; an order line: ORDNAME + KLINE) without guessing the format. Child and grandchild blocks add Line keys / Row keys editors for the deeper levels.
The per-field editors are operation-aware: on Create blocks the form's key fields lead the list (marked “— key”; leave them empty on autonumbered forms and Priority assigns the value), while on Update blocks key fields are hidden from the mapping — the record is addressed by the Record keys editor, and only editable fields are offered.
Record with line items — any form, one line per subitem
Create Priority record with line items creates a header record and its subform lines in one request, in any form that has a subform: an order with ORDERITEMS_SUBFORM, an invoice with its items, a price quote with its lines. Pick the Priority form and the lines subform, fill the Header fields editor (the record's own fields — column tokens work), and each subitem of the item becomes one line.
Line values come from the subitem columns. In the Line fields editor, next to each subform field type the title of the subitem column that fills it — PARTNAME ← “Part”, TQUANT ← “Quantity”, PRICE ← “Unit price” (“Name” means the subitem's name). Leave the editor empty and the convention applies: a subitem column titled like a Priority field (e.g. a column named TQUANT) fills that field. Values are converted to the subform's field types; an empty subitem column is simply not sent, and a column title that no subitem has stops the run with a message listing the titles available. Leave the line key (e.g. KLINE) empty — Priority numbers the lines.
✨ Build it with AI — describe the workflow, monday assembles it
monday's AI workflow builder knows every Priority block in this App. Open Automate → Build with AI, describe what should happen in plain language, and it wires the trigger, the Priority blocks and the field mappings for you. Two rules make prompts land precisely: say "Priority" so the builder picks this App's blocks, and name the Priority form (ORDERS, CUSTOMERS, AINVOICES, PART…) — Hebrew names work too. Ready-to-paste examples:
- "When the status of an item changes to Approved, create a sales order in Priority form ORDERS for the customer in the 'Customer #' column, with one order line per subitem — part number and quantity from the subitem columns — and write the new order number back to the 'Order #' column."
- "When a Priority record changes in form CUSTOMERS, update the matching item on this board with the record's data; the 'Customer #' column holds the record ID."
- "When a button is clicked, get the Priority order whose number is in the 'Order #' column and post its status and total as an update on the item."
- "Every morning, search Priority form AINVOICES for open invoices over 10,000 and sync them into this board — match by invoice number, create missing items, update existing ones."
- "כשסטטוס משתנה ל'אושר', צור הזמנה בפריוריטי במסך ORDERS עם שורה לכל סאב-אייטם, וכתוב את מספר ההזמנה בעמודה 'מס' הזמנה'."
The same skills are available in monday Sidekick (AI chat): ask it to search, read, create or update Priority records, add order lines, or append remarks — in English or Hebrew. It always shows what it is about to change and asks for confirmation before touching your ERP.
5 Mapping templates — map a whole form once
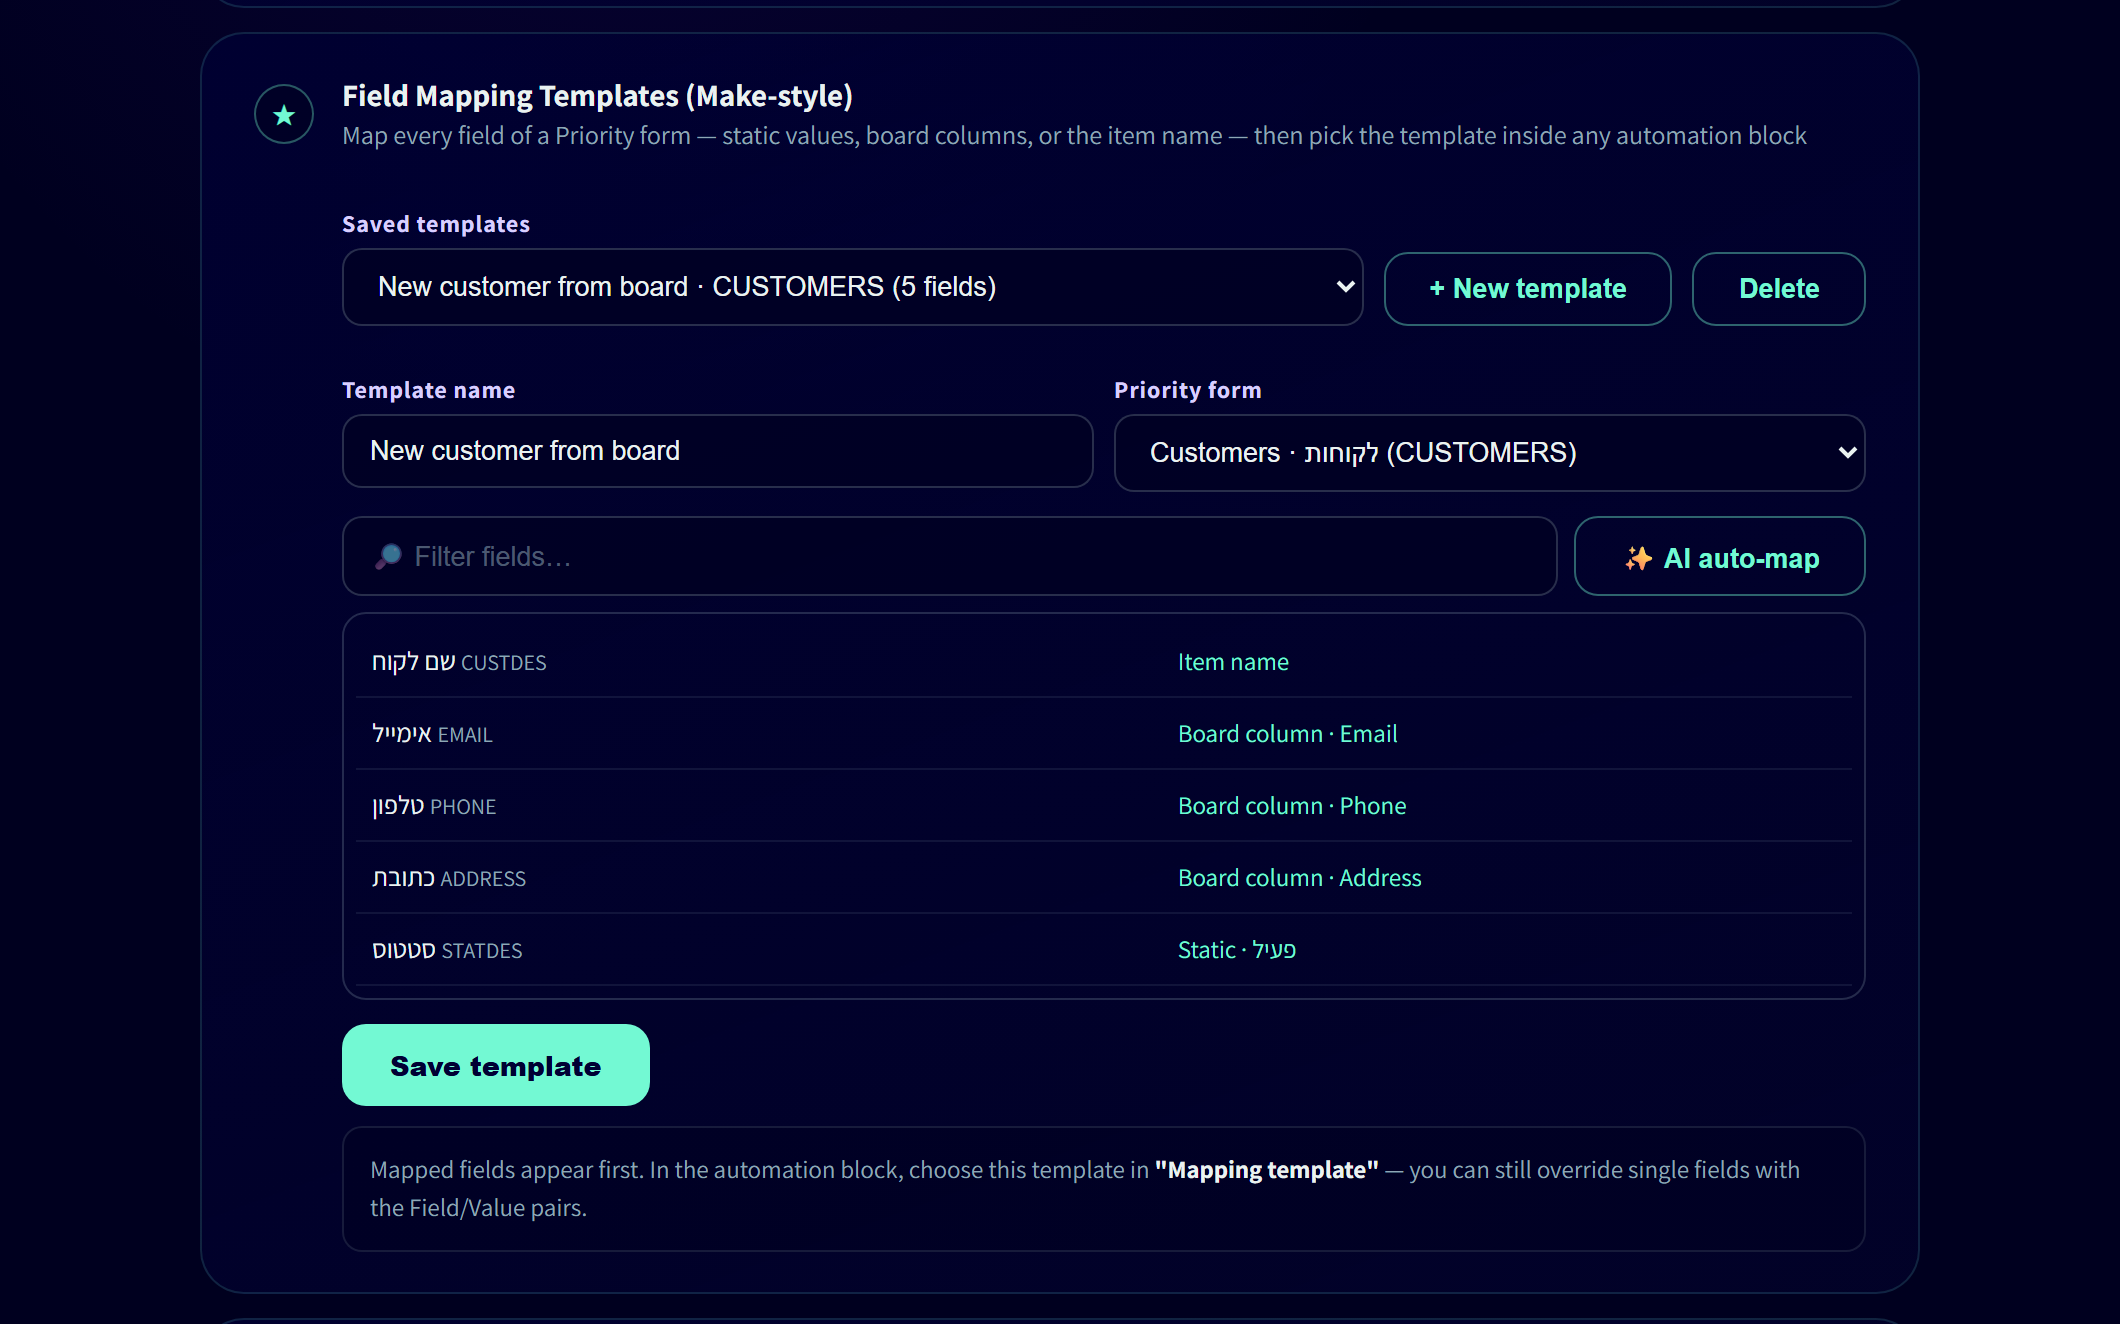
In the Setup & Sync view, step ★, build a mapping template: pick a Priority form and choose a source for each field — a board column, the item name, or a static value. ✨ AI auto-map matches board columns to Priority fields by name and type (Hebrew-aware). Then select the template inside any automation block — single fields can still be overridden.
6 Saved filters & Ask Priority
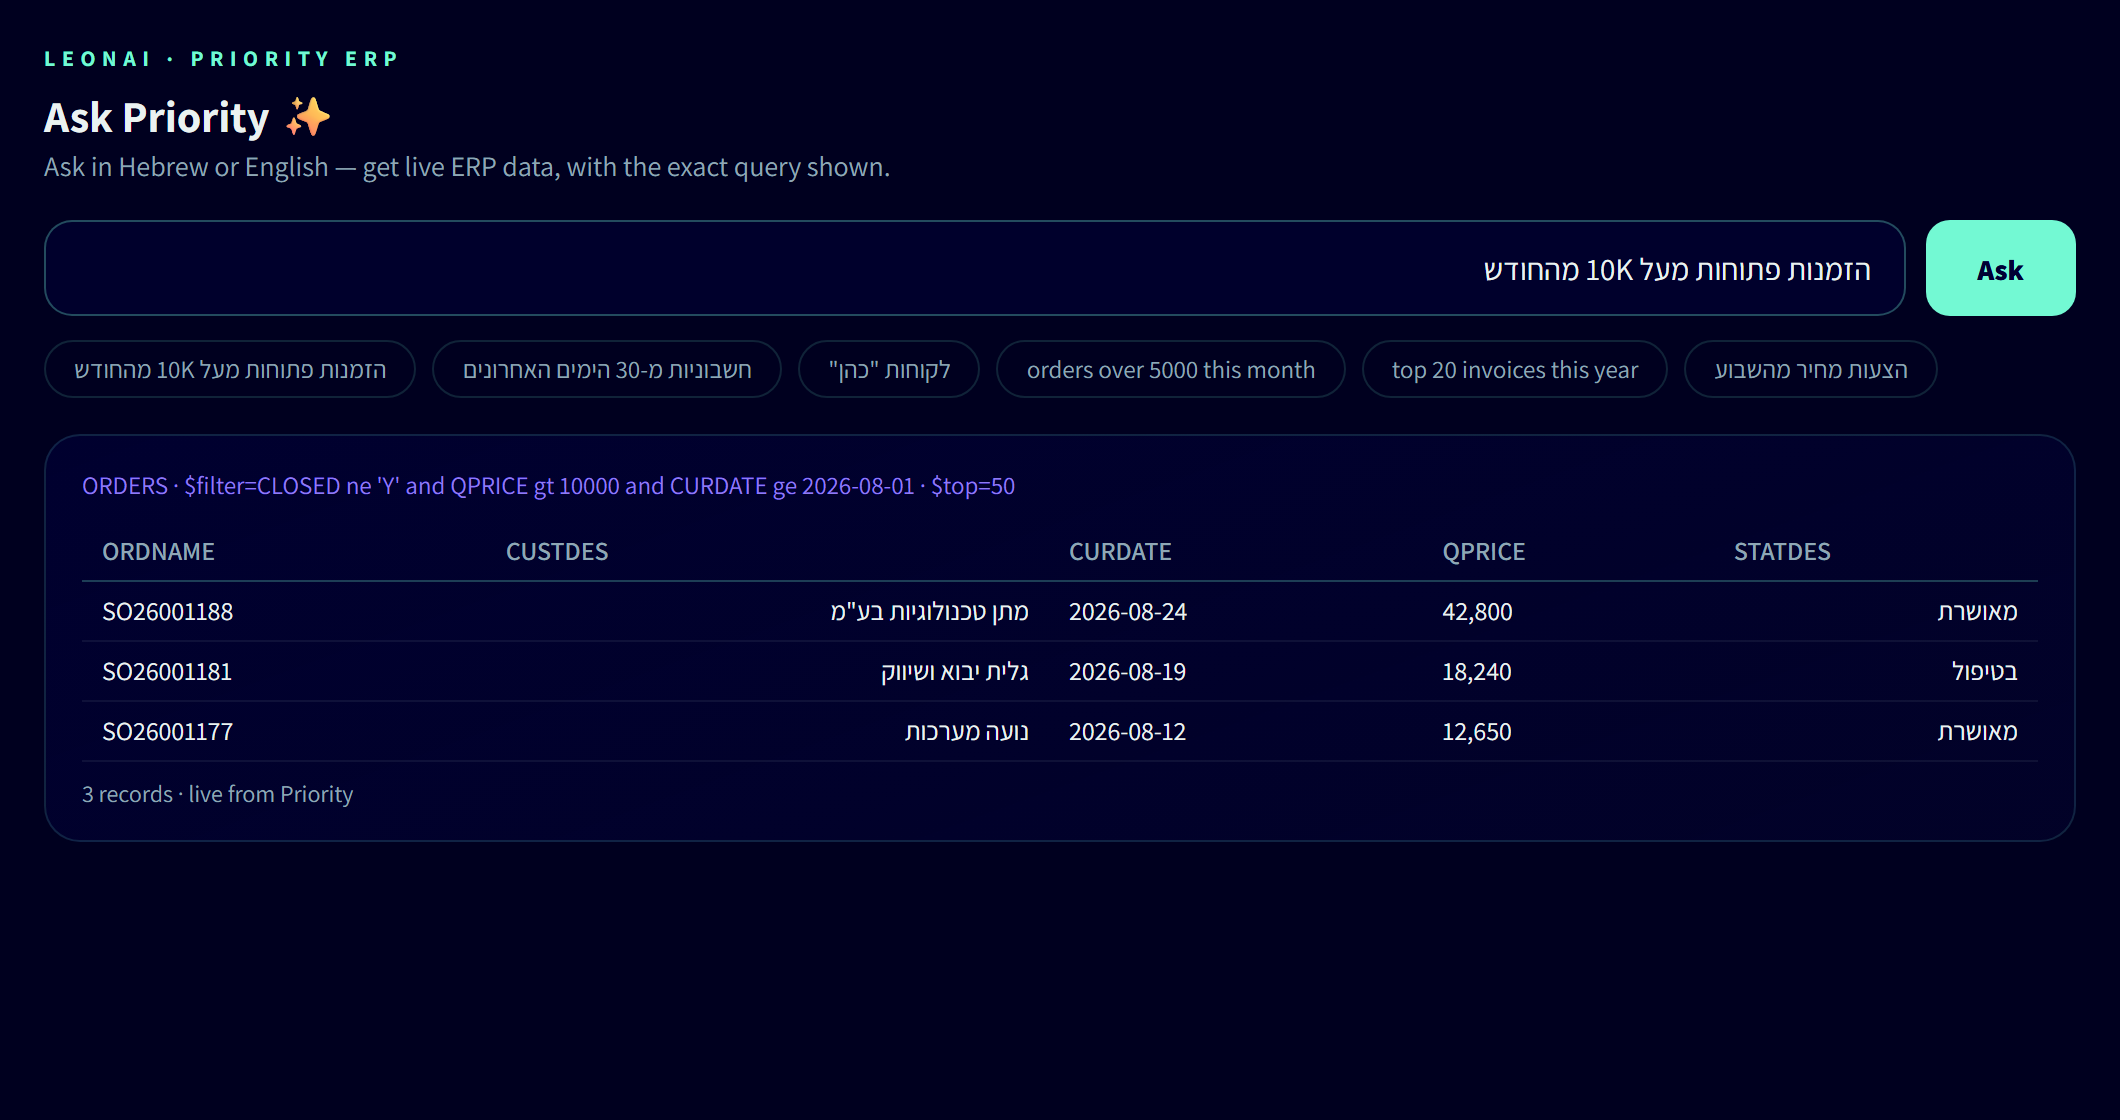
Build Priority filters visually (or describe them in Hebrew/English), preview live data, and save them — saved filters then appear in the Search and Sync blocks. The Ask Priority (AI) board view answers plain-language questions with live ERP data and shows the exact query it ran.
7 Work from the item — push, pull, files
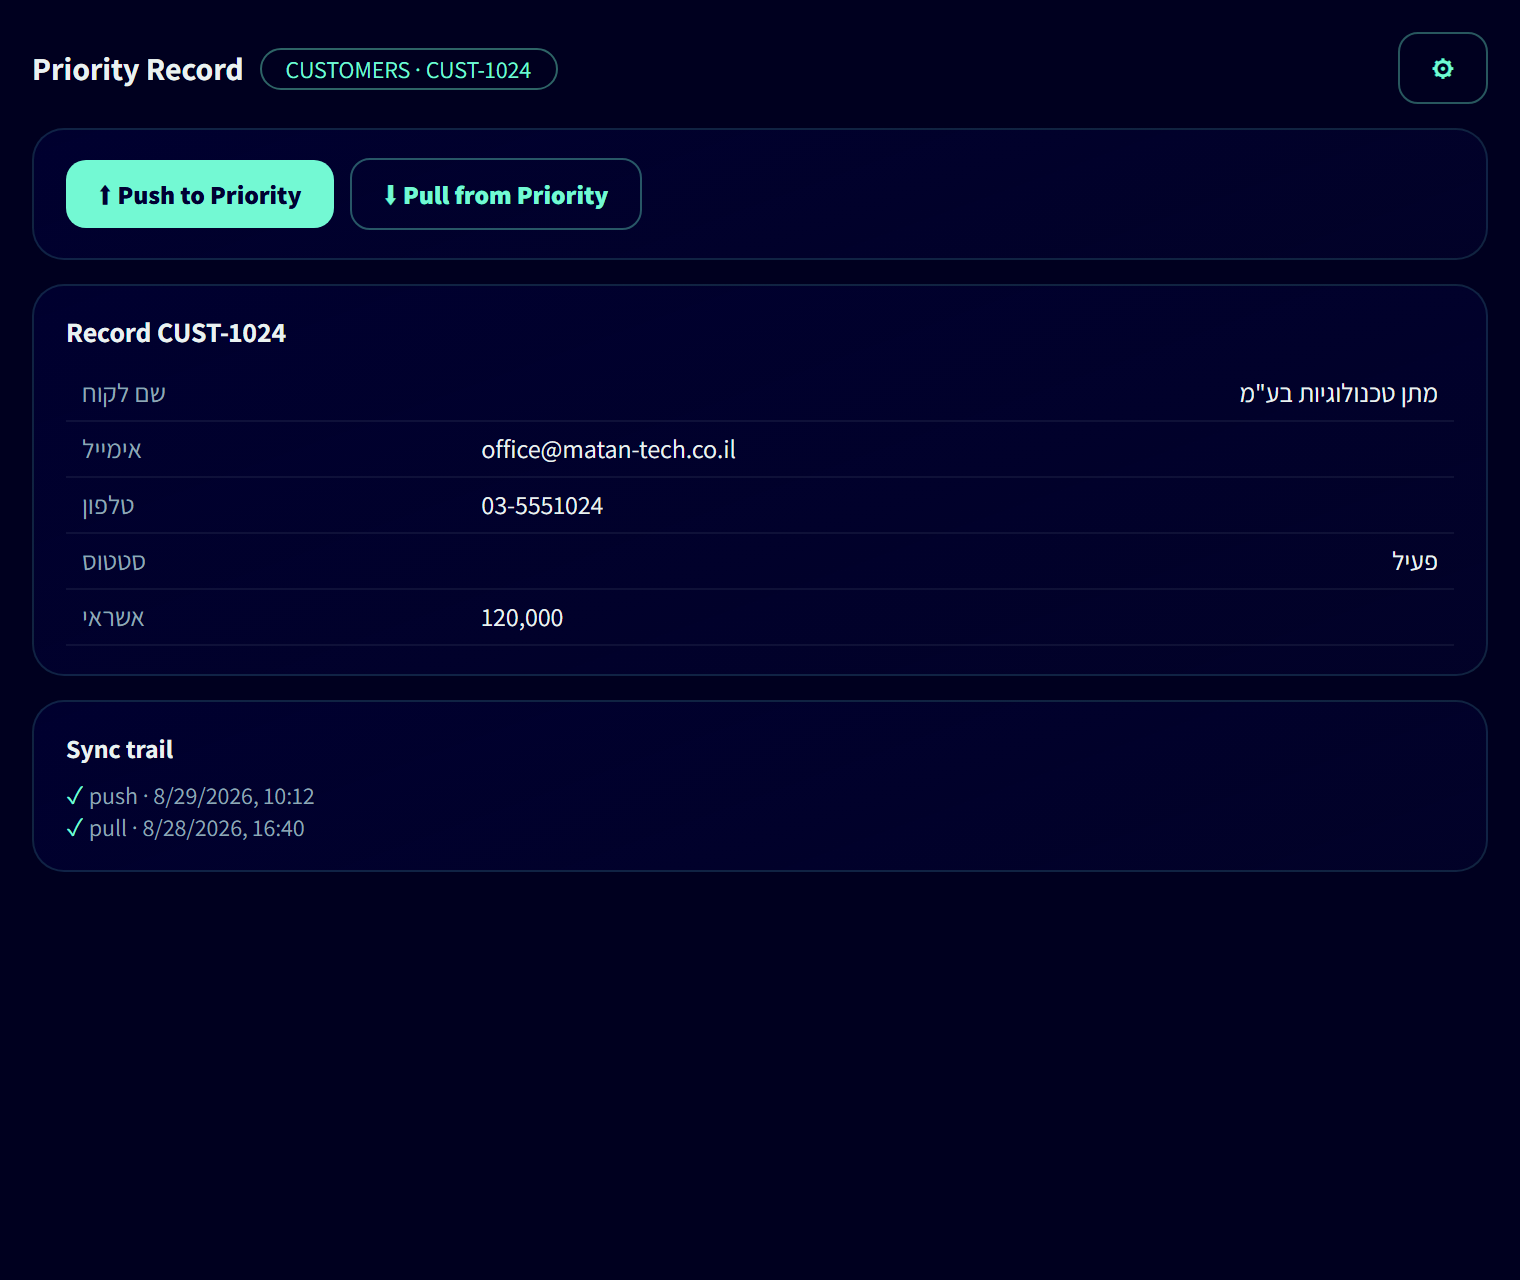
Add the Priority Record item view to see the linked Priority record next to any item, push item changes to Priority, pull the latest values back, and transfer file attachments in both directions. Use the item menu's Sync to Priority now for one item, a selection, or a whole group.
8 Monitor sync health
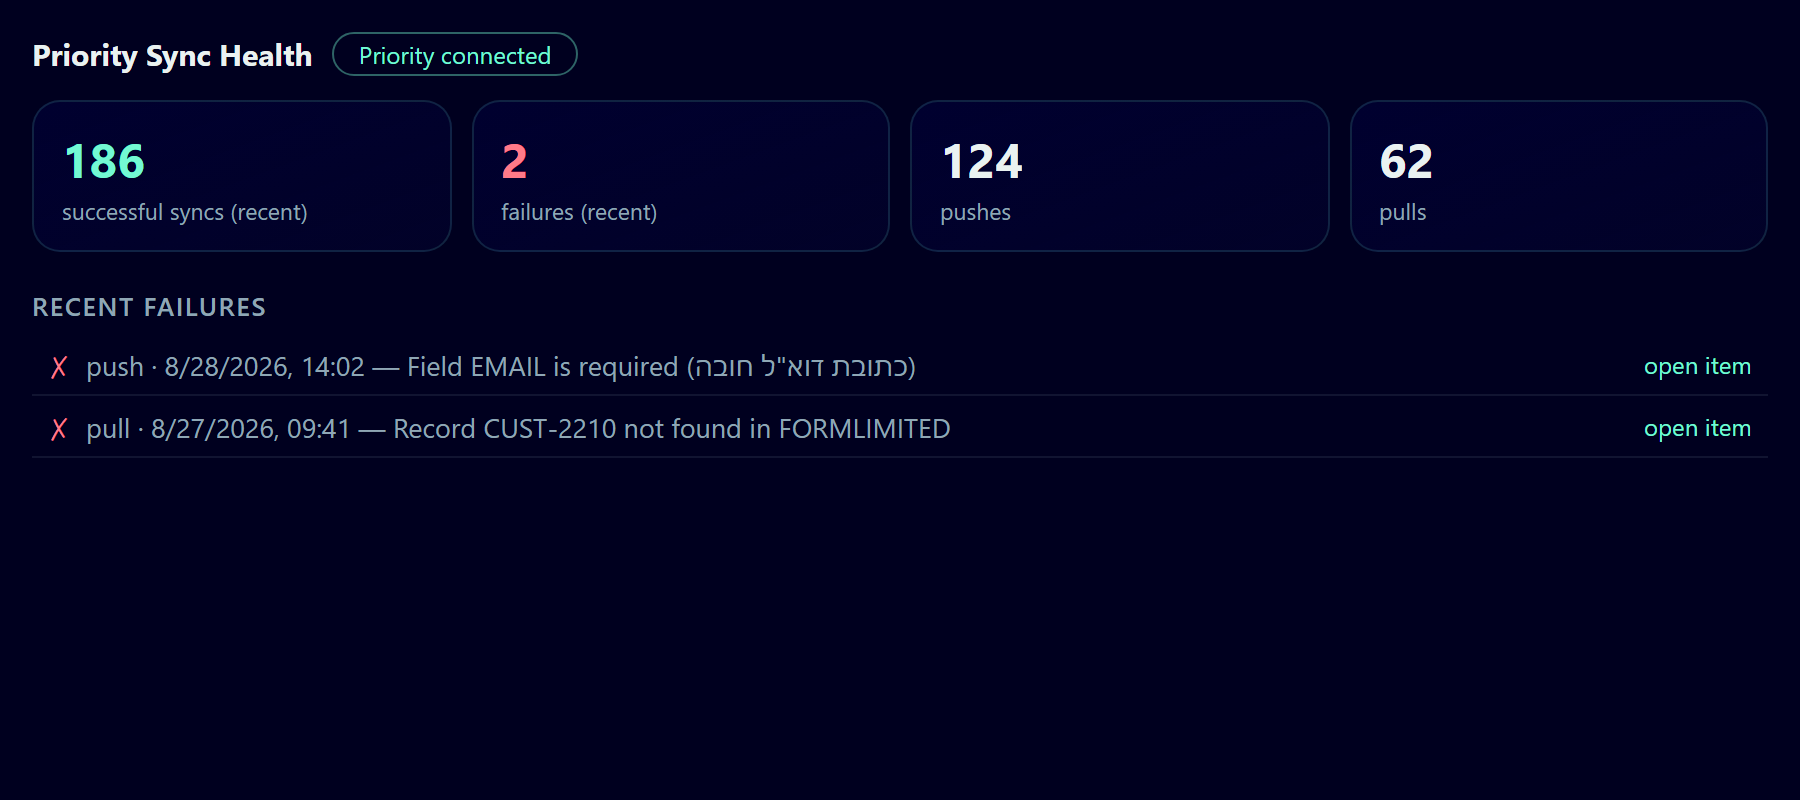
Add the Priority Sync Health widget to any dashboard for success/failure counts, recent errors with actionable hints (bilingual), usage, and one-click jumps to failing items.
9 Plans & usage
The free tier includes a monthly quota of sync operations; paid plans remove the limit. Your current usage is always visible in the Setup & Sync view and the Sync Health widget. Billing is handled entirely by the monday.com marketplace.
10 Troubleshooting
| Symptom | Fix |
|---|---|
| Test connection fails with 401 Unauthorized | The PAT is wrong or expired — create a new one in Priority and update it in Setup & Sync. |
| An automation fails with "לא ניתן להפעיל API למסך זה" (or a 400/404 on a specific form) | The form is not open for API use — in Priority add it to FORMLIMITED ("טופסי API") with the REST flag for the API user, then click Refresh forms & permissions in Setup & Sync (otherwise the App picks it up at its daily re-read). |
| A form is missing from dropdowns | Dropdowns show only forms your API user may use (plus their subforms). Enable the form in FORMLIMITED, then click Refresh forms & permissions — the note under the form list reminds you. |
| A saved template, filter or item-view setup shows a ⚠ not enabled for the API warning | Its form was removed from FORMLIMITED after it was saved. Re-enable the form in Priority, or point the template/filter at another form. |
| Step 3 says FORMLIMITED could not be read | The API user cannot read the FORMLIMITED form itself, so every form is listed and Priority decides at call time. Give the API user read access to FORMLIMITED for accurate dropdowns. |
| The "When a Priority record changes" trigger never fires | The webhook chain has three links — check them in order: (1) the URL from Setup & Sync step 4 is registered in Priority's Webhook Definitions (it changes only if you reinstall the App); (2) the form has a BPM rule with Do the following → Webhook that actually matches the change you make, and its message body includes the form's key field; (3) the workflow's form/operation filters match — "any change" is the safest start. Requires Priority's Webhooks module. |
| "Doesn't match your other selections" in the automation builder | A column was picked before the board changed — re-pick the column. |
| Timeouts on very large syncs | Add a saved filter or a since window (e.g. 7d) to sync in smaller slices. |